


A close-knit club of people who breathe Tilburg sociability and have the ambition to always go the extra mile.
Gwen
A close-knit club of people who breathe Tilburg sociability and have the ambition to always go the extra mile.

Google’s product keeps evolving. In recent times, the best way to set up a server-side tagging environment was through a subdomain. This makes it possible to set first-party cookies required for your tools. These have a longer lifespan than third-party cookies. You collect more data as a result, and the data remains a lot more reliable.
With Safari’s new measures, it takes even more than just creating your own domain to extend the shelf life of cookies. These are kept for 7 days from a subdomain with a different IP address.
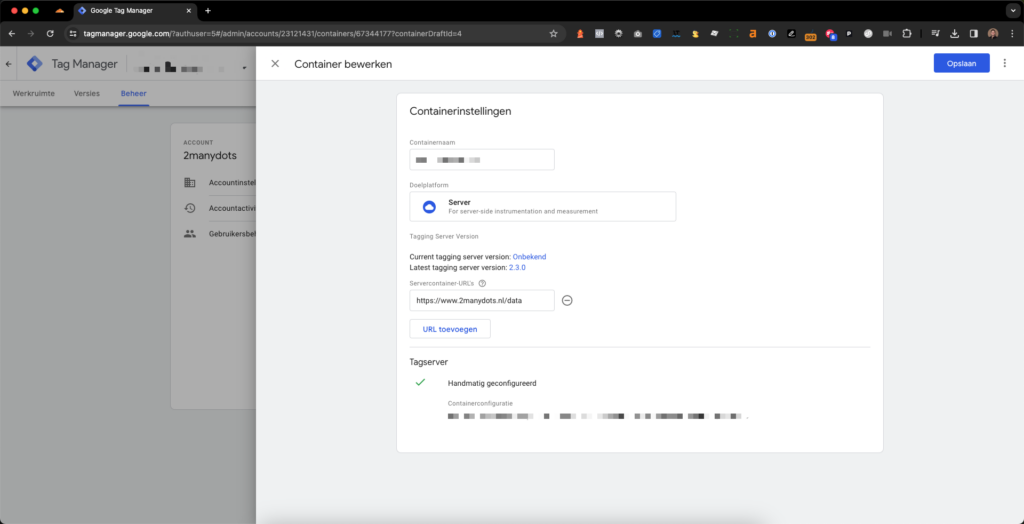
Google recently changed the preferred method for linking a custom domain to Google Tag Manager’s server container. Instead of using a subdomain (such as sgtm.2manydots.co.uk), it is now recommended to use the same origin domain (such as 2manydots.co.uk/data).
By using your own domain on the same origin for sGTM, you benefit from the main advantage of server-side tagging: setting first-party cookies. And because the tagging server uses the same origin domain, you don’t need to configure additional settings to extend the lifetime of cookies. However, configuring a path on the same domain is a lot more complicated than setting up a subdomain.
With this latest update, there are several ways you can load your server side tagging environment onto your website. We’ll go over these with you.
| Same origin (path) | Subdomain | Default domain (Google) | |
|---|---|---|---|
| Example URL | https://www.2manydots.nl/data | https://data.www.2manydots.nl | https://sgtm.run.app |
| Server-set cookie access | Full access to security and benefits. | Full access to security and benefits. | None. Only JavaScript cookies are allowed |
| Difficulty | Difficult. You configure a CDN or load balancer to forward requests to your server. | Average. You just need to modify a DNS record for your subdomain | Easy. You don’t have to make any changes to the DNS yourself. |
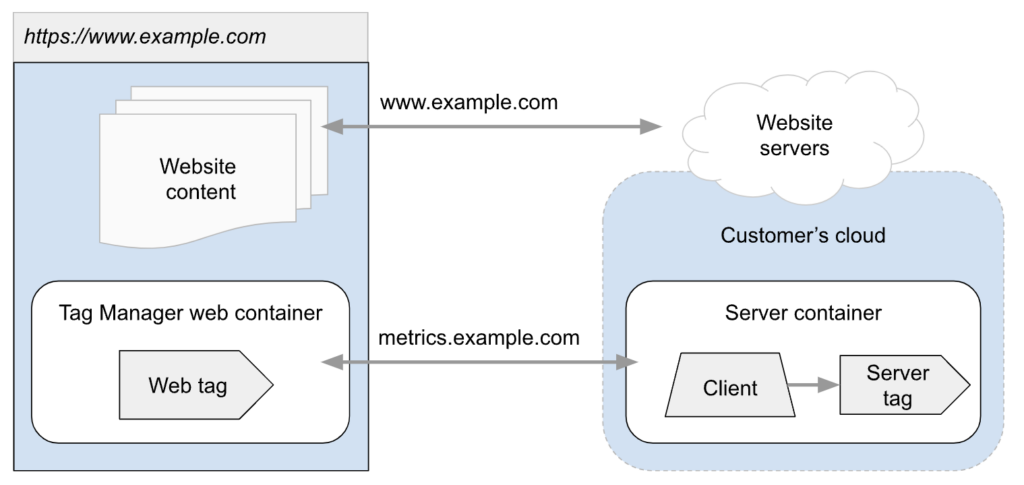
This is the way that was presented from the beginning. This way, you place your tagging server on a subdomain. All data is processed on this and forwarded through an API to desired services such as Google Analytics 4 or the Facebook Conversions API.
Make sure the subdomain of your website is different from the subdomain on which you want to run your server side tagging container. For example, suppose your website is reachable at www.2manydots.nl, choose a different subdomain for your server container, such as sgtm.2manydots.co.uk. The image below shows how this works.
This is Google’s newest way. Instead of configuring a subdomain, here you link a path to the tagging server. Which path you want to use for this is entirely up to you. In our case, for example, that could be www.2manydots.nl/data. It does not matter what you choose, as long as it is not yet used in your website.
We’ll help you through setting this up yourself, if you already have a server side tagging environment. To configure this, you need the following:
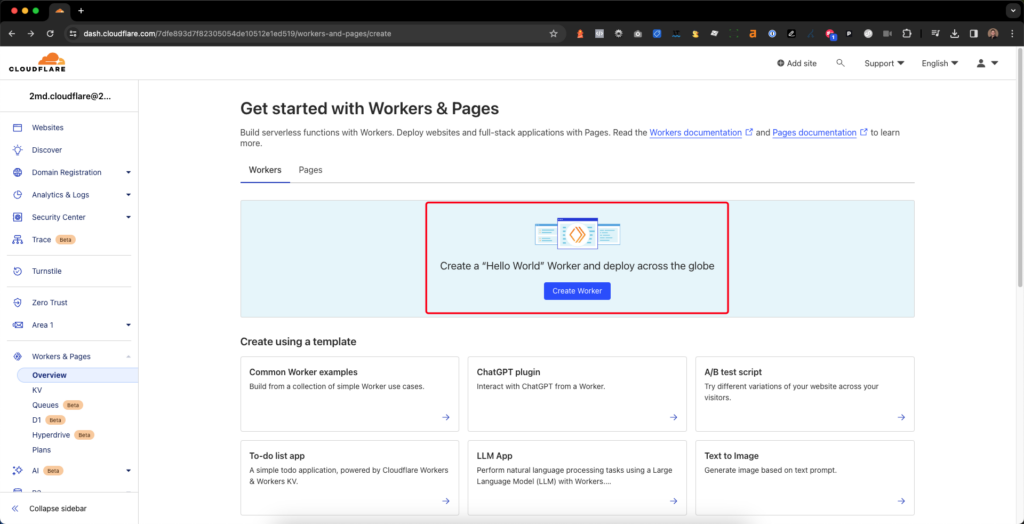
There are several ways to configure this, but we do it through Cloudflare. It is tremendously easy to configure this here through a worker. Please note that workers are not free. You may use a maximum of 100K requests per day in the free subscription.
Create your worker and give it the name you want.
It’s time to create your worker. We have already written the code for you. There are two things to choose:
const newPath‘.const newDomain‘.
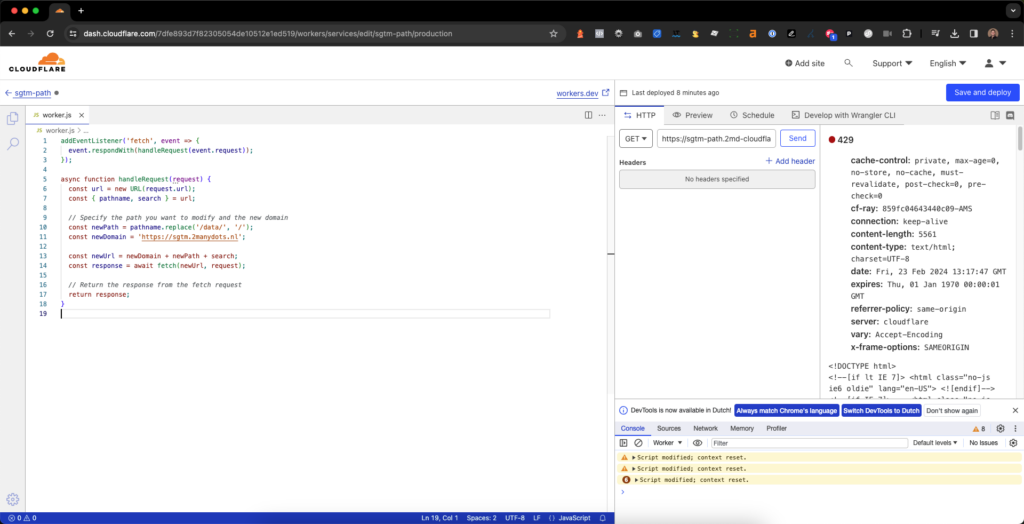
addEventListener('fetch', event => {
  event.respondWith(handleRequest(event.request));
});
async function handleRequest(request) {
  const url = new URL(request.url);
  const { pathname, search } = url;
  // Specify the path you want to modify and the new domain
  const newPath = pathname.replace('/data/', '/');
  const newDomain = 'https://sgtm.www.2manydots.nl';
  const newUrl = newDomain + newPath + search;
  const response = await fetch(newUrl, request);

  // Return the response from the fetch request
  return response;
}Once you have saved the worker, it is important to trigger the worker on the path you have chosen. You do this under the ‘Triggers’ tab in your created worker. Disable the automatically created route.
Create a new route. Enter the following here: www.jouwwebsiteurl.nl/gekozenpad/*
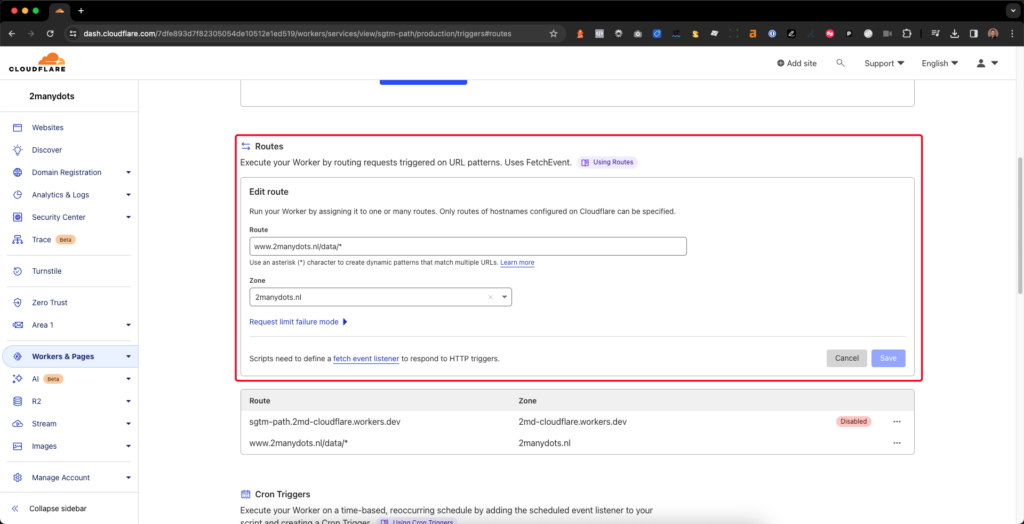
Adjust the configuration of your server container in Google Tag Manager so that it can recognize the path and process requests correctly. Did you do this? Then click the preview button and start a debug session to see if it works. Also be sure to adjust your variables, especially if you are loading your GTM container through a subdomain.
Did you follow all the steps? Then you’re done! All your data now goes through the (sub)domain of your website and the chosen path, directly to the tagging server. Because the tagging server uses the same domain as your website, you don’t need to configure additional settings to keep cookies longer.
If you can’t figure it out, we’ll be happy to help. Our team has done over 100 server side tagging implementations and is not afraid of new challenges. Take a look at our server side tagging page, or contact us.